Saturday, July 16, 2016

Personal 3D Printer Creality CR7


Personal 3D Printer Creality CR-7 / 3D Prototyping (Full Assembled and DIY Set)


Description: 

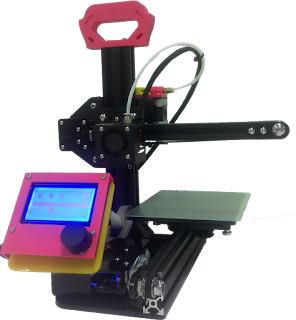
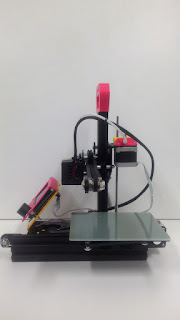
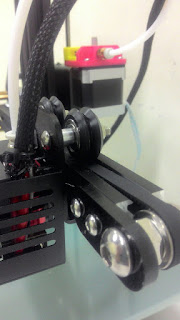
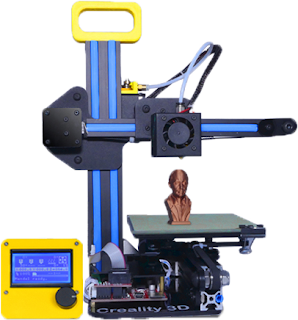
The incredible personal mini 3D printer, CR-7 is now coming. Unique structure design with newest V-slot frame, it brings high accuracy and low noise printing. Line-type bearing and cantilever type: light weight, move smoothly, low noise, fast speed, more accuracy and easy for debugging. The CR-7 is super lightweight, only 3.5KG. With a handle for convenient to carry and potable for user specially children. The working power voltage for CR-7 is only 12V, and can be powered by Uninterruptible Power Supply (UPS). There is no pre-heating requirement for the printing platform and the nozzle is covered, these features reduce the scald danger and safe to be used by children. It come with a LCD control screen that shows the real-time printing status. User can adjust the printing speed, nozzle temperature and so on. The LCD screen and motherboard is pluggable, very easy for DIY and using, you can finish the assembly in 1 hour.

Creality CR-7 can print PLA, Wood-like Material and Flexible Rubber. It also have SD Card to support offline printing. With its portable body, you can enjoy the 3D printing On-The-Go, can be used anytime, anywhere. Creality CR-7 is perfect for DIY amateur, artistic design, architectural design, education, 3D photo studio, etc. Transform a small desk in your home or classroom into an exciting creativity centre.


Features: 

·        Easy and affordable 3D printing. Designed for entertaining and education.
·        Unique structure design, smooth and stable motion with newest V slot frame.
·        High printing speed with high printing resolution.
·        Light weight, only 3.5kg and portable personal 3D printer.
·        Safe for children, working voltage only 12V, no heating bed, covered nozzle.
·        LCD graphical display and user-friendly interface.
·        Support various type and colour of filament.

Specifications: 
Machine Dimension
310(L) x280(W) x320(H) mm
Weight
3.5kg
Print Volume
130 x 150 x 100mm
Printer Speed
50 – 120mm/s (Adjustable)
Compatible Filament
PLA, Flexible Rubber (PLA) and Wood-Like Materials
Filament Diameter
1.75mm
Software Support
Cura / Repetier-Host
Operating Windows
Win10/8/7/XP/Vista
Layer Accuracy
0.05 – 0.4mm (Adjustable)
File Type
STL / OBJ / JPG / PNG
Power Supply
12V
Printing Method
Online / Offline Printing
Operating Ambient Temp.
20°C – 35°C
Operating Relative Humidity
20% – 50%


Package included:
1. Creality CR7 3D Printer ( full assembled set) (1 months warranty) x1
2. 1kg PLA filament  x1
3. 8GB SD card x1
4. SD card reader x1
5. Tools (as shown below) x1


For more information please visit our online store: 
Creality CR7 3D Printer (Full Assembled): 
Creality CR7 3D Printer (DIY Set): 

Follow our Facebook: 
https://www.facebook.com/imRoboticist or https://www.facebook.com/maker360Malaysia


Download FREE 3D models now from website: www.thingiverse.comwww.pinshape.comwww.myminifactory.com and you can print using this awesome CR-7 3D Printer. Bring your ideas into reality!

Make your pre-order today to get more discount! 


Contact Now: Mr. Kayson 012-7803379

Monday, June 20, 2016

Cura Installation Tutorial for 3D Printer Creality CR-7 & CR-8 Lesson 2

Cura Installation Tutorial for 3D Printer Creality CR-7 & CR-8 

Lesson 2 Cura Settings

In lesson 2, you will learn how to fine-tune the Cura settings such as quality, material, speed, cooling, support and platform adhesion. While the basic print settings are fine to start with, the Advanced Cura settings give you more control over the output. In order to access the Advanced setting, go through the tabs in the Print Setup pane on the left-hand side of the Cura window.

Cura Tutorial - Settings - Step 1: Retraction and Quality Settings

  1. In the Mode field, select Advanced instead of Basic. Below the print setup, a number of tabs for Retraction, Quality etc are displayed.
  2. It is recommend that you leave Retraction turned on (located on Basic Mode). Retraction means that the filament will be retracted, i.e, pulled back, when the nozzles moves over an area that is not printed. In this way, no filament will flow out from the nozzle. There will be no "stringing" - no thin threads of plastic between the printed parts of your object.
  3. The Quality is to define the surface quality of your 3D printed object.
  4. The Bottom/Top Thickness is usually also set to 0.8mm. If you print an object with a large flat top, you may want to print more layers in order to close the top surface completely. This avoids the unwanted "pillowing" effect.  (Again, the value must be integer multiples of the nozzle diameter).

Cura Tutorial - Settings - Step 2: Speed and Infill Settings

  1. The Travel Speed setting determines how fast head moves when it is not printing (e.g. when moving from one wall to the next). The defaults 150mm/s is fine for most cases.
  2. There are other speed settings that let you control the speed for specific parts of the print. In case, you wish to change any of these speed settings, set them to integer multiples of Print Speed - this makes accelerating and decelerating smoother when changing e.g. from infill to shell printing.

Cura Tutorial - Settings - Step 3: Cooling

  1. Turn off the Enable Cooling Fan setting is not recommend as it will result in warping and other ugly surface effects.
  2. In order to control the cooling fan more precisely, open the expert configuration. E.g. the Fan Speed settings in order to increase Maximum Fan Speed when it is very hot in the office or to decrease it when the fan is too loud.
  3. Make sure a layer has enough time to cool before the next layer is printed above it, set the Minimal Layer Time. Increasing this value also increases print time.
  4. Through the Minimum Speed setting you can make sure the printer does not slow down too much. It prevents the nozzle stay on the same spot for a longer time - keeping the plastic at that spot hot. A Minimum Speed below 100mm/s will reduce print quality.
  5. When you print an object with a small top, we recommend you use the Lift Head option. This removes the print head from your object so it can cool down (otherwise, you may end up with a blob at the top of the object).

Cura Tutorial - Settings - Step 4: Support and Platform Adhesion Settings

  1. Do not turn off the Enable Support option on the Basic mode. Otherwise floating or overhanging parts cannot be printed.
  2. The placement option determines where supports are attached: Touching Buildplate means the supports are based only on the build plate; Everywhere means the support structures can also be built on the model or inside the model.
  3. The Overhang Angle value determines how much overhang a part has to be supported; the default is 60°. Note that setting the Overhang Angle to 90° will create no support structures at all.
  4. In order to improve bed adhesion or in case your object does not have a flat bottom, you can add a Brim or Raft, If you don't, Cura automatically adds a skirt around the object. The skirt is a line arounf the print on the first layer that helps prime the extruder. A Brim is made of few lines attached directly to the object's bottom; this increases the bottom surface and minimizes warping issue. A Raft is a thick grid underneath the model and helps the object to stick on the build plate.
* If you simply want the skirt printed, set Type to None and select the number of skirt lines and the distance to the object.
* If you want a brim printed, select Type: Brim and set Brim Line Count, i.e. the number of lines to be printed.
*To have a raft printed, select Type: Raft and adjust the margin, the thickness and other settings.


(License: The text of "Cura Tutorial for 3D Printing Beginners" by All3DP.
Source: https://all3dp.com/cura-tutorial-3d-printing/)

Cura Installation Tutorial for 3D Printer Creality CR-7 & CR-8 Lesson 1

Cura Installation Tutorial for 3D Printer Creality CR-7 & CR-8 

Lesson 1 Installation and Basic Settings

In this tutorial, I will explain how to do the correct Cura settings to slice your 3D model and how to create a G-code file for your personal 3D printer CR-7 and CR-8 for beginner.

Let's say now you have a 3D model in the STL or OBJ file format - either downloaded from online platform or you designed with CAD software. Before you transfer your 3D model to the 3D printer, the particular model has to be translated into a format that the printer can handle through a software. This process is called slicing as the model is sliced into thin layer from the bottom all the way up to the top. A lot of the free software can do the slicing such as CuraSlic3rCraftWareRepetier, etc. 

In this tutorial, Cura is used, the free software created by the makers of the Ultimaker printers. Cura allows you to import STL or OBJ file, it not only slices your model; it creates the commands to your printer to execute the printing process, called G-code. When slicing process is finished ,save the g-code on a SD card that you insert into your printer.

Cura Tutorial - Lesson 1: The Basics

In lesson 1, basic steps needed to turn a 3D model in STL or OBJ format into G-code file will be shown.

Cura Tutorial - Basics - Step 1: Installing Cura

1. Download the latest Cura softaware from the Ultimaker website and install it. Cura_15.04.6 (dating from June 2016)
2. Launch the installer. The setup wizard will pop out, click "Next" to begin the installation .

3. Click "Finish" and start Cura 15.04.6.
4. Add the setting according to your 3D printer model. Choose "Other", follow by "Custom". 
   For CR-7 user, follow the left-hand side setting; for CR-8 user, follow the right-hand side setting.
5. Congratulation! You have done the installation!

Cura Tutorial - Basics - Step 2: Overview

1. Load/Open file: Use to open your STL or OBJ file, you can drag and drop the files here too.
2. View Mode: Let you switch between Layers and Solid view.
3. Print Setup: Printer-specific settings which user can access to all the settings (Basic Mode and Advanced Mode) and can be changed. Let's start in Basic Mode and switch to Advanced Mode in lesson 2.
4. Save to Disk: When you are finished, save the G-code to your hard disk or SD card for the printer.

Cura Tutorial - Basics - Step 3: Handling 3D Model in Cura

1. Load a 3D model into Cura using the "Load" button or the File > Open command.
2. Explore different view mode. In Solid View, you see the entire object (the way it will look when printed). In Layer View, you can go through layer by layer with the scrollbar at the bottom right. When switching to Layer View, it may take a short time before the layers are calculated and displayed (depending on the model and on your computer hardware).
3. You can scale, rotate or mirror it on the build platform. Just play with these functions (you can undo the changes later).
4. Remember to keep the "Uniform Scaling" always locked, otherwise the printed model will be distorted. To close the Scale box, click the Scale button a second time. 
5. Right-click the model to open the context menu. Here, you can undo the changes to the model and center it on the platform again. You may also duplicate the object, if you wish to print several copies of the model.

Cura Tutorial - Basics - Step 4: Cura Settings

For now, we work in Basic Mode. The values you can manipulate it to obtain the best printing quality:
  • Layer Height is default 0.1mm. You may adjust it according to the printer's ability. If your printer supports thinner layers, you decrease the height to get smoother surfaces - that will increase print time, however.
  • The Shell Thickness setting of Cura determines the thickness of the object's wall. It has to be an integer multiple (1x, 2x, 3x, etc) of the nozzle diameter. A thickness setting of 0.8mm means that the walls will be 2 lines wide (as the nozzle of CR7 or CR8 has a diameter of 0.4mm).
  • The Bottom/Top Thickness is usually also set to 0.8mm. If you print an object with a large flat top, you may want to print more layers in order to close the top surface completely. This avoids the unwanted "pillowing" effect.  (Again, the value must be integer multiples of the nozzle diameter).
  • Infill Density determines how much plastic is printed inside the object. A higher value means that more plastic will be printed. Typically, 10% to 20% are sufficient to build strong objects. In case, you wish to print the object completely hollow, set the density to 0%.
  • Print Speed ( recommended 50 - 60mm/s)
  • Printing Temperature (recommended PLA: 185 - 210°C; ABS: 210 - 230°C)
  • check the "Enable Support" option (in this case, no supports are required). Most of the 3D models require support structures. So, it is better to always have Enable Support checked. Supports are needed when your model has overhanging parts or parts floating in the air.
  • Bed Temperature (recommended PLA: 45 - 60°C; ABS: 60 - 90°C) 
  • Flow (%) is the entire amount of the material that needs to be extruded for your model. The Flow value is usually set to 100%, so the extruded amount equals the amount of material required. You only need to increase this setting if you use very soft materials.
ATTENTION! 

  • Diameter of the filament is 1,75mm and the machine nozzle size is 0.4mm!
  • If you wish to print faster than default Print Speed (50 - 60mm/s), it is recommended to increase the Print Temperature value as well so that the plastic is properly melted.


The below is the recommended Creality 3D Printer setting is for material PLA. (*Printer settings vary in shape, orientation and complexity of the 3D model.)
Cura will calculates layer height, print duration and other settings according to the quality you selected.  

Cura Tutorial - Basics - Step 5: Generate a G-code file

For this first lesson we are almost finished. The last step is saving the model in a printable g-code file.
  1. Click the Save to Disk button or select File > Save; Save Gcode.
  2. Enter a file name and the folder where the file is stored. You may store the file on the SD card you use to transfer the file to your 3D printer.
  3. Reminder: Select Gcode File (*.gcode) and click Save.

(Source: https://all3dp.com/cura-tutorial-3d-printing/)